Finding your position
by the sky
A vessel at sea is accountable to its position whether or not it knows what that position is. This is the arithmetic that removes that uncertainty.
Electronic navigation replaced this knowledge without defeating it. The sun has not moved. The geometry connecting your eye, the horizon, and a point of light ninety million miles away is unchanged. What it requires is attention, and the willingness to do a small amount of arithmetic.
Work through the modules in order. The calculations are built in.
Concepts & the Navigation Triangle
The equal-altitude circle, coordinates, GHA, declination, LHA.
Computed Almanac
GHA and declination for Sun, Moon, planets and stars. Any date, any moment.
Altitude Corrections
Dip, refraction, semidiameter, parallax — from sextant reading to observed altitude.
Sight Reduction
The full St. Hilaire intercept method — from sextant altitude to line of position.
Plotting & Running Fixes
Multiple lines of position on an interactive chart. Where they cross is where you are.
Special Sights
Polaris latitude. Meridian noon shot. Compass deviation from sunrise bearing.
Sextant Technique
How to hold it, swing the arc, take a sun sight, measure index error, and sight stars at twilight.
Star Finder
Which stars are visible from your position right now. Altitude, azimuth, identification notes. The tool you use ten minutes before twilight.
Planetarium
Live sky view with constellation lines. Shows where to look for any star — altitude, bearing, and the surrounding constellations to guide you there.
Full Walkthrough
Complete end-to-end sight reduction with a real sextant. Step-by-step guide and home drill to test what you know.
Error Analysis
What goes wrong and why. How to recognise a bad sight, diagnose a poor fix, and build judgement about which results to trust.
Knowledge Drill
Ten questions across all topics. Worked explanations for every answer.
The Navigation
Triangle
Every celestial sight reduces to one spherical triangle and two equations. The geometry has not changed since the method was formalised. Understanding it clearly is the work of this module.
The equal-altitude circle
When you measure a celestial body at altitude 40°, you are standing on a small circle on Earth where every observer sees that body at exactly 40°.
The centre of this circle is the body's Geographical Position (GP) — the point on Earth directly beneath the body. The radius of the circle is the co-altitude: 90° − 40° = 50°, converted to nautical miles (1° = 60nm).
Two sights from different bodies give two such circles. Your position is (one of) their intersections. A third sight resolves the ambiguity.
New to this? Plain English explanation
Imagine shining a torch straight down at a globe in a dark room. It makes a dot of light on the surface. Now imagine you are a tiny figure on that globe, and you can measure how high the torch is above your horizon — say 40°. You are not standing at the lit dot. But you are standing somewhere on a circle drawn around that dot.
Every person standing on that circle would measure the same 40°. That circle is called your line of position. You know you are on it — but not exactly where.
Measure a second body (another star, or the moon), and you get a second circle. Two circles on a sphere cross at two points. You know roughly where you are, so you pick the right one. That crossing point is your position. That is the whole of celestial navigation.
Ancient insight
Eratosthenes measured the Earth's circumference around 240 BC using nothing but the sun's altitude at two locations on the same meridian — exactly the same principle we use today.
For two thousand years, navigators could only find latitude from meridian shots of Polaris or the noon sun. Longitude required an accurate clock — which only became available in the 1760s with Harrison's chronometer.
Electronic navigation hasn't changed the geometry. It has merely automated the calculation.
New to this? Plain English explanation
Latitude is how far north or south you are — like the horizontal lines on a globe. Longitude is how far east or west — the vertical lines.
Latitude was always easy to find from the stars — Polaris sits almost directly above the North Pole, so its height above your horizon tells you your latitude immediately. Longitude was the hard problem. To find it you need to know the exact time, because the sky moves at 15° per hour. Without an accurate clock you couldn't know what time it was back in Greenwich, and therefore couldn't calculate your longitude.
Harrison solved this in the 1760s with a clock accurate enough to keep time at sea. That clock — the chronometer — made full celestial navigation possible. Every offshore navigator since has carried one in some form.
Earth coordinates
Latitude (L) — degrees N/S of equator, +N −S
Longitude — degrees E/W of Greenwich
Greenwich Hour Angle (GHA) — the westward angle from Greenwich to the body's GP. Ranges 0°–360°. Think of it as the longitude of the body's GP but always measured westward.
Local Hour Angle (LHA) = GHA − West Longitude (or + East Longitude). This is the key quantity: how far the body has moved west of your meridian.
New to this? Plain English explanation
You already know latitude and longitude from maps and charts. Latitude tells you how far north or south you are (0° at the equator, 90° at the poles). Longitude tells you how far east or west (0° runs through Greenwich, London).
GHA is the sky's equivalent of longitude for a celestial body, but it is always measured westward — so it runs from 0° to 360° and keeps increasing as the Earth rotates. The sun's GHA increases by about 15° every hour.
LHA adjusts GHA to be relative to your position rather than Greenwich. If you are west of Greenwich, subtract your longitude from GHA. If you are east, add it. The result tells you where the body sits in your own sky right now — and that is the number the main calculation needs.
Body coordinates
Declination (d) — celestial equivalent of latitude. The sun's declination varies from S23.4° (winter solstice) to N23.4° (summer solstice). Stars have fixed declinations.
Sidereal Hour Angle (SHA) — a star's fixed westward angle from the First Point of Aries (♈). The star's GHA = SHA + GHA of Aries.
GHA of Aries — from almanac; advances ~15° per hour as Earth rotates.
New to this? Plain English explanation
Declination is simply the latitude of a star or the sun on the celestial sphere — the imaginary sphere of sky above the Earth. The sun moves from S23.4° in December to N23.4° in June, which is why days are longer in summer. Stars have fixed declinations that never change.
Aries (♈) is a reference point in the sky — a fixed direction in space used as a zero point for measuring star positions, the way Greenwich is a zero point for measuring longitude on Earth. SHA is how far west a star sits from that reference point.
In practice you rarely calculate SHA yourself — it is listed in the almanac for every navigational star, and changes only very slowly over years.
Computing LHA — the critical step
LHA = GHA − West Longitude
— If result < 0, add 360°; if > 360°, subtract 360°
For stars: GHAbody = SHAstar + GHAAries
The navigation triangle is a spherical triangle on the celestial sphere with three vertices:
Zenith (Z)
The point directly overhead — defined by your latitude L and longitude. Its co-polar distance from the pole = co-latitude = 90° − L.
Pole (P)
The elevated pole (North or South). All angles are measured from here. It links the meridian system to the body's declination.
Body (X)
The body on the celestial sphere. Its co-polar distance = co-declination = 90° − d. The angle at the pole = LHA.
New to this? Plain English explanation
The diagram looks abstract, but the triangle it shows is just a way of organising everything you know into a single picture from which the answer falls out.
Imagine standing on deck at night. Look straight up — that's your Zenith (Z). It's a point on the celestial sphere directly above you. Look toward the North Star — that's close to the Pole (P). Look at whatever star you just measured — that's the Body (X). Connect those three points with arcs on the sphere, and you have the navigation triangle.
The three sides of the triangle encode what you know. The side from Pole to Zenith depends on your latitude — specifically 90° minus your latitude (called co-latitude). The side from Pole to Body depends on the star's declination — 90° minus declination (co-declination). The side from Zenith to Body depends on the altitude you measured — 90° minus altitude (co-altitude).
The angle at the Pole between those two sides is exactly LHA — how far the body has moved west of your meridian. This is the angle you calculated from GHA and your longitude.
The angle at the Zenith between those two sides is the azimuth Zn — the compass bearing to the body.
So: you know three of the four quantities (your latitude, the body's declination, and the LHA). Solving the triangle gives you the other two — the computed altitude Hc and the azimuth Zn. You compare Hc to what you actually measured. The difference is your intercept. That is the entire calculation.
All celestial navigation — sun, stars, moon, planets, lunar distances, great-circle sailing — reduces to the law of cosines for spherical triangles:
— generic spherical triangle formula
Applied to the navigation triangle, this gives the two working equations:
sin Hc = sin L · sin d + cos L · cos d · cos LHA
Azimuth:
cos A = (sin d − sin L · sin Hc) / (cos L · cos Hc)
Then: if LHA > 180°, Zn = A
if LHA < 180°, Zn = 360° − A
That's it. Two equations, four inputs (L, d, LHA, Hc), two outputs (Hc, Zn). Every calculation in this trainer uses exactly these equations.
New to this? Plain English explanation
The formula looks intimidating but you never need to work it by hand — the calculator in this app does it for you. What matters is understanding what it does.
It takes four things you know — your latitude (L), the body's declination (d), the local hour angle (LHA), and your rough position — and tells you two things: Hc (the altitude the body should have if you were at your estimated position) and Zn (the compass bearing to the body).
You compare Hc to what you actually measured (Ho). If they are the same, you are exactly where you thought. If they differ, the difference in minutes of arc tells you how many nautical miles off you are. One minute of arc = one nautical mile — the same relationship that defines the nautical mile.
sin, cos: these are trigonometry functions. You do not need to know what they are — just that the calculator handles them. All you need to supply are the four input numbers.
Computed
Almanac
GHA and declination for any body at any moment. The Nautical Almanac is an annual book of these numbers. This computes them directly — no physical almanac required.
Date, Time & Body
How the almanac works
The Sun
The Sun's GHA increases at ~15°/hour as Earth rotates. Its declination oscillates between N23.4° and S23.4° over the year, determined by Earth's axial tilt. At the vernal equinox, declination is 0°.
New to this? Plain English explanation
As the Earth spins, the sun appears to move across the sky from east to west. GHA tracks that movement — it increases by 15° every hour (360° in 24 hours = 15°/hr). So if GHA was 90° at 6am, by noon it will be 180°.
Declination is the sun's latitude in the sky, and it changes slowly through the year as the Earth orbits the sun. In June it is about N23° (sun high in the sky for northern observers). In December it is S23° (low in the sky). At the equinoxes (March and September) it is 0°.
Stars
Stars have effectively fixed SHA and declination (tiny annual proper motion). Their GHA = SHA + GHA of Aries. Since Aries advances ~15°/hour, a star's GHA also advances at that rate.
New to this? Plain English explanation
Stars are so far away that they appear fixed relative to each other — they form the permanent background of the sky. Each star has a fixed SHA (its position measured from the Aries reference point) and a fixed declination (its celestial latitude).
Because the sky rotates as a whole — or rather, the Earth turns beneath it — all stars move at the same rate: 15° per hour westward. So to find a star's GHA at any moment, you add its fixed SHA to the current GHA of Aries (which the almanac or this app provides).
Planets
Planets move slowly relative to stars. Their GHA and declination are tabulated daily and change by small v and d corrections per hour. For training, approximate values are sufficient.
New to this? Plain English explanation
Unlike stars, planets move across the sky background over days and weeks — that is why ancient peoples called them "wandering stars" (planet comes from the Greek for wanderer). Their positions cannot be described by a fixed SHA.
For celestial navigation, Venus, Mars, Jupiter and Saturn are all usable. They are often the brightest objects in the sky, making them easy to identify and sight. Their positions are calculated from orbital mechanics — which is what this app does — or looked up in the printed almanac.
The Moon
The Moon's GHA advances ~14.5°/hour (slower than stars). Its declination varies ±28.5° over ~27 days. It requires the largest parallax correction of any body (up to 61').
New to this? Plain English explanation
The moon moves more slowly across the sky than the stars because it is orbiting the Earth, partially counteracting the Earth's rotation. It also has a visible disc — unlike stars and planets which appear as points — which means you need to account for which edge (limb) of the moon you are sighting.
The parallax correction for the moon is large (up to 1°) because the moon is close enough that your position on Earth's surface shifts the apparent direction to the moon significantly. This does not matter for distant stars, but for the moon it must be calculated. The Corrections module handles this automatically.
Altitude
Corrections
The raw sextant reading is not yet geometrically useful. Three practical distortions stand between Hs and the observed altitude Ho that the navigation triangle requires.
— Signs depend on which limb is sighted and the body observed
Correction Calculator
Dip
The higher your eye, the farther the visible horizon — which is lower than the true horizon. This makes your sextant reading too high.
Dip (') = 0.971 × √h (h in feet)
Always subtracted
New to this? Plain English explanation
If you stand higher up, you can see farther. The horizon you see is farther away and therefore slightly below true horizontal. This means when you align a star with the horizon through a sextant, the horizon is slightly lower than it should be — which makes the star appear higher than it really is.
The correction depends only on your eye height above the sea. Standing on a small yacht cockpit at 2m: dip ≈ 2.5'. On a ship's bridge at 10m: dip ≈ 5.6'. Always subtracted because it always makes the reading too large.
Refraction
Atmosphere bends light downward, making bodies appear higher than they are. Largest at low altitudes (33' at horizon), zero at 90°.
Always subtracted; avoid sights below 10°
New to this? Plain English explanation
Light bends as it passes through the atmosphere, in the same way a straw appears to bend when placed in a glass of water. The atmosphere is thicker near the horizon, so the bending is greatest for objects near the horizon and zero for objects directly overhead.
The practical effect: a star near the horizon appears about half a degree higher than it really is. At 45° altitude the correction is under 1 minute. This is why you should avoid sights of bodies below about 10° altitude — refraction is large and also unpredictable due to atmospheric conditions.
Semidiameter
Sun and Moon have visible discs. We sight the limb but need the centre. Lower limb: add SD. Upper limb: subtract SD.
Moon SD ≈ 0.2724 × HP
+SD lower limb, −SD upper limb
New to this? Plain English explanation
Stars appear as points of light, so you sight them directly. But the sun and moon are discs — they have a visible size. When you use a sextant on the sun, you bring the bottom edge (lower limb) down to touch the horizon, because it gives a crisp, easy alignment.
The problem: you need the centre of the sun, not its bottom edge. The semidiameter is the radius of the disc — about 16 arc minutes for the sun. So you add 16' to get from the lower edge to the centre. If you had sighted the top edge (upper limb) instead, you would subtract 16' to get down to the centre.
Parallax
We observe from Earth's surface, not its centre. Parallax is only significant for the Moon (up to 61'). Stars and Sun have negligible parallax.
Sun: included in almanac table
Always added
New to this? Plain English explanation
The navigation triangle is calculated as if you were at the centre of the Earth. But you are standing on the surface, about 6,400 km from the centre. For distant stars and the sun, this offset is negligibly small. For the moon — which is only 385,000 km away — it matters significantly.
Think of holding your finger close to your face and viewing it with one eye, then the other. The finger appears to shift position relative to the background. That shift is parallax. The moon is close enough that your position on Earth's surface causes a similar apparent shift — up to about 1°. This correction is always added to bring your observation back to what it would have been from Earth's centre.
Sight
Reduction
Given your best estimate of position, compute the altitude and bearing the body should have from there. Compare to what you measured. The difference — in nautical miles — puts you on a line.
Step 1 — Your assumed position (AP)
Enter your dead-reckoned position. This is your best guess. The method works regardless of how far off you are — larger errors just mean a longer intercept.
New to this? Plain English explanation
You do not need to know your position to use this method — that is the whole point. You just need a reasonable estimate. This is called your assumed position (AP) or dead-reckoned position.
Dead reckoning means calculating where you should be based on where you were, how fast you have been going, and in what direction. It accumulates errors over time — but it gives you a starting point good enough to begin a celestial fix. The sight reduction then tells you how far off your estimate was and in what direction to move it.
If you are completely lost, use your last known position. Even a position that is 50 miles wrong will work — you just get a longer intercept line.
Plotting &
Running Fixes
Enter your LOPs from sight reductions. Two lines crossing is a fix. Three form the cocked hat — your position is near its centre, and the size of the triangle tells you how well your sights agreed.
Add an LOP
LOPs added
No LOPs added yet.
Running Fixes
The estimated position fix
When you get a new LOP and have a DR position, the best estimated position (EP) is the foot of the perpendicular from your DR position to the LOP. This preserves all information: the LOP constrains the direction perpendicular to it; your DR track constrains the parallel direction.
Never just use the traditional "advance the LOP" method — it discards DR information and can move your estimated fix in the wrong direction.
New to this? Plain English explanation
A single sight gives you a line — you are somewhere on it. Your dead-reckoning (DR) position gives you a dot — your best estimate before the sight. Together they give you something better than either alone.
Draw a perpendicular from your DR dot down to the line. The foot of that perpendicular is your best estimated position. It respects both the line (you must be on it, or close to it) and your DR (you move the minimum distance from your estimate). This works even when your sights are imperfect.
The cocked hat
Three LOPs rarely meet at a point. They usually form a triangle called the cocked hat. Your most probable position is near the centre, but the true position can be outside the triangle.
A cocked hat with azimuths spanning more than 180° is preferable — systematic altitude errors then tend to cancel, placing the true fix near the centre.
New to this? Plain English explanation
In an ideal world, three lines of position from three different bodies would cross at exactly one point — your position. In practice, small errors in each sight mean the three lines form a small triangle instead of meeting at a point. Navigators have called this triangle the cocked hat for centuries.
Your position is most likely near the centre of the triangle. The size of the triangle tells you how good your sights were — a small, tight cocked hat means consistent, accurate work. A large one means more uncertainty. If the triangle is very large, re-examine your sights for errors before trusting the result.
Choosing your three bodies with their azimuths spread widely (ideally 120° apart) gives the cleanest result and the most useful cocked hat.
Special
Sights
Three shortcuts that have served navigators for centuries. Each gives a useful position line or latitude from a single observation, without the full reduction workflow.
Why Polaris?
Polaris sits within 1° of the North Pole. Its altitude is approximately equal to your latitude. A single shot gives you latitude directly, without an almanac for LHA.
The approximation formula accounts for Polaris not being exactly at the pole:
cd = co-declination of Polaris ≈ 0.72°
New to this? Plain English explanation
Polaris — the North Star — happens to sit almost directly above the Earth's North Pole. This means it barely moves as the Earth rotates, while all other stars sweep circles around it. Its height above the horizon is almost exactly equal to your latitude.
At latitude 51° N (London), Polaris sits 51° above the northern horizon. At 35° N (Mediterranean), it sits 35° above the horizon. You measure it with a sextant, apply a small correction (because Polaris is not quite at the pole — it orbits the pole in a tiny circle of about 0.72°), and you have your latitude.
This only works in the northern hemisphere. There is no equivalent bright star over the South Pole, which is why southern-hemisphere navigators rely on other methods for latitude.
Calculate latitude from Polaris
The noon shot
At Local Apparent Noon (LAN), the sun transits your meridian. Its altitude is maximum and its azimuth is exactly due North or South. A single altitude gives latitude; the time of transit gives longitude.
If sun is north of you: L = d − (90° − Ho)
d = declination at moment of transit
New to this? Plain English explanation
Every day the sun arcs across the sky from east to west. At some moment it reaches its highest point — that moment is Local Apparent Noon. At that instant, the sun is exactly due north or due south of you (which one depends on whether you are north or south of the tropics).
You watch through your sextant as the sun climbs. When it stops climbing and starts to descend, note the altitude. That single reading, combined with the sun's declination for that day (from the almanac), gives your latitude by simple arithmetic — no assumed position, no LHA, no complex calculation. This is the oldest reliable position line at sea.
If you also note the exact time (GMT) when the sun was at its peak, you can calculate your longitude: noon happens when GHA = 360° − your west longitude. Rearranging gives your longitude directly.
Latitude from meridian sight
Sun azimuth compass check
At sunrise or sunset, calculate the sun's true azimuth using the altitude equation. Compare to your compass bearing (corrected for variation). The difference is your deviation.
(at H = 0°, i.e. sunrise/sunset)
This gives the true bearing of sunrise/sunset for any date and latitude — no sextant needed.
New to this? Plain English explanation
A compass does not point to true north — it points to magnetic north, which is offset from true north by an amount called variation (which changes depending on where on Earth you are, and is printed on charts). On top of that, the magnetic materials in your boat can deflect the compass needle further — this is called deviation, and it varies depending on which direction you are heading.
The compass check uses the sunrise or sunset bearing to catch these errors. The formula calculates the true bearing of the sun at the horizon for your latitude and the sun's declination. You then measure the compass bearing of the rising or setting sun, subtract variation, and compare. Any remaining difference is your compass deviation.
This check requires no sextant — just a compass and the knowledge of your approximate latitude. It should be done regularly at sea, particularly when heading changes, as deviation can shift significantly.
Compass deviation check
Sextant
Technique
The mathematics can be automated. The sighting cannot. This module covers what a course does not have time for — the physical practice of taking a reliable sight at sea.
What you are holding
A sextant is a mirror instrument that measures the angle between two objects — almost always a celestial body and the horizon. The optical path uses two mirrors to bring the reflected image of the body down until it appears to rest on the horizon. The angle between the mirrors gives the altitude.
The arc is graduated in degrees. The micrometer drum reads minutes and decimal minutes. A good sextant reads to 0.1 arc minutes — sufficient for navigation to within 2 nautical miles in competent hands.
New to this? Plain English explanation
Imagine holding two mirrors at a fixed angle. One mirror looks forward at the horizon. The other, which you can rotate, captures the sun and bounces it into the first mirror, so both images appear in the same eyepiece. When you rotate the second mirror until the sun appears to sit exactly on the horizon, the angle of rotation tells you the sun's altitude. That is a sextant.
The arc at the bottom is graduated in degrees — a full sextant covers about 130°. The small drum at the side reads the fractional degree in minutes (there are 60 minutes in a degree). You read the whole degrees off the arc, then add the minutes from the drum.
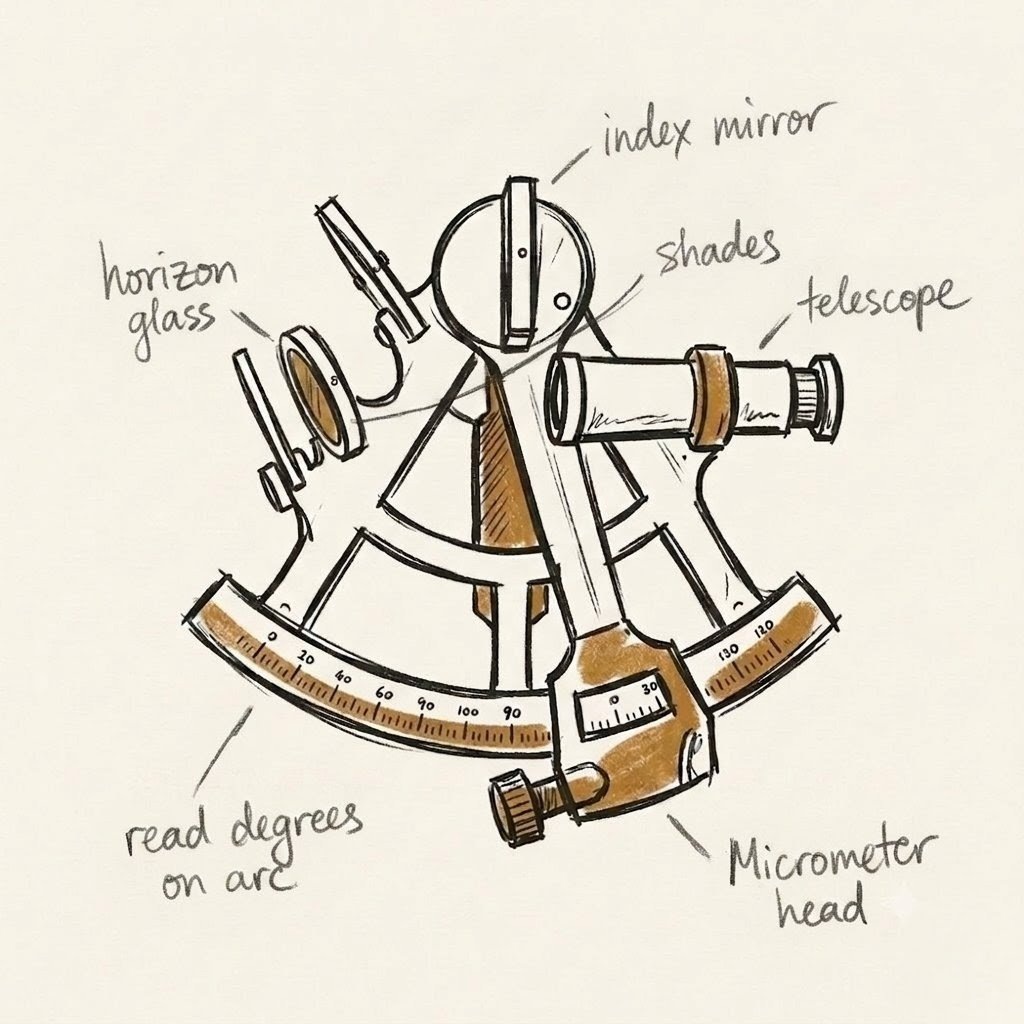
The principal parts
Frame — the rigid triangular body, typically brass or aluminium. Rigidity matters; a flexing frame means inconsistent readings.
Index mirror — the large mirror on the index arm, which rotates. This is what you adjust to change the altitude reading.
Horizon glass — the fixed half-mirror through which you look. One half is clear (for the horizon), one half is silvered (for the reflected body).
Index arm & micrometer drum — what you turn to bring the body to the horizon. The drum reads minutes; one full turn = one degree.
Telescope — low-power, typically 4× or 7×. The 4× gives a wider field, easier to use on a moving boat. The 7× gives a sharper image for precise work.
Shade glasses — coloured filters in front of both mirrors to reduce the sun's glare. Use enough that you can look comfortably. Never look at the sun without them.
Set the index error to zero
Before each session, measure your index error (see the Index Error tab) and note it down. Do not adjust the sextant to remove it — adjust the result in calculation. A stable, known index error is better than a recently adjusted one that may have shifted.
New to this? Plain English explanation
All sextants have a small built-in error — when the index arm is set to 0°, the two mirrors are not quite perfectly parallel, so the instrument does not read exactly zero. This is called index error (IE), and it is normal. You do not need to fix it — you just need to know what it is and apply it consistently.
If index error is +2', every reading is 2' too high — so subtract 2' from every Hs before doing corrections. If IE is −1.5', every reading is 1.5' too low — so add 1.5'. Measure it before each session. If it has changed since last time, note the new value. A large change suggests the sextant was knocked or stressed.
Shade glasses
For the sun, use enough shade glass on the index mirror side to look comfortably. The horizon glass shades are typically not needed for the horizon itself, only if the horizon is very bright. Never look at the sun without index mirror shades in place — permanent eye damage can occur instantly.
For stars and planets, remove all shades. They are dim enough that any filter will make them invisible or too faint to align precisely.
New to this? Plain English explanation
The shade glasses are the coloured filters that slot in front of the mirrors. They are rated from light to dark — typically three or four densities. For the sun on a bright day, use two or three stacked on the index mirror side until the sun appears as a comfortable orange disc, not blindingly bright.
A common mistake for beginners is using too little shade — the sun appears blinding, making precise alignment impossible. Another is using shade glasses on the horizon glass, which darkens the horizon and makes it harder to see clearly. Keep the horizon glass clear unless the sea is very bright and glassy.
Body selection and pre-setting
Before going on deck, calculate the approximate altitude and azimuth of the body you intend to sight. Set the sextant to that altitude on deck before searching. Searching for the sun from 0° wastes time and risks losing it; setting to the computed altitude and sweeping a small arc finds it immediately.
For stars, this is essential — you cannot identify a star through a sextant from 0° in a dark sky. Pre-set the expected altitude from the star finder or a preliminary calculation and the star will appear in the field of view almost immediately.
Timing
Have a second person call the exact time from an accurate timepiece at the moment you call "mark." Alternatively, use a stopwatch started at a known time and note the elapsed seconds. The watch should be accurate to 2 seconds — a 4-second error equals 1 nautical mile of longitude error.
Record time before corrections and calculations, not after. The raw sight and its exact time is the irreducible record.
New to this? Plain English explanation
Timing is the other half of the measurement. You need two things: the angle (from the sextant) and the exact moment (from a clock). The standard procedure: one person holds the sextant and watches the body; a second person watches an accurate timepiece. When the sight is perfect, the first person calls "mark." The second person reads the time to the second and writes it down.
If you are singlehanded, start a stopwatch at a known GMT time, take the sight, and immediately read the elapsed seconds. Do the arithmetic afterwards. The important thing is that the stopwatch is running and you read it the moment the sight is made — not a few seconds later when you have lowered the sextant.
The procedure
Set the sextant to the approximate altitude. Hold it vertically in your right hand, the arc facing away from you. Look through the telescope at the horizon. Rotate the index arm until the sun appears in the silvered half of the horizon glass, roughly sitting on the horizon.
Now rock the sextant (see Swinging the Arc). When you are satisfied the instrument is truly vertical, use the micrometer drum to bring the lower limb of the sun down until it just kisses the horizon. Call "mark" and note the time.
New to this? Plain English explanation
The sequence in practice: set the approximate altitude before you go on deck. Go to the windward side of the boat — spray from the leeward side will be on your face and in the optics. Brace yourself against the shrouds or a stanchion, or stand with your legs apart and knees slightly bent to absorb the boat's motion.
Hold the sextant loosely — a tight grip transmits arm shake. Look through the telescope. If you pre-set the altitude correctly, the sun will be visible near the silvered mirror. If not, slowly adjust the index arm until the sun appears, then bring it down to the horizon level.
The sun is a disc. The bottom edge is the lower limb. You bring the lower limb down to kiss the horizon — not cut through it, not sit well above it. The word navigators use is tangent: the lower limb should be just touching the horizon.
Upper vs lower limb
The lower limb (bottom edge of the sun) is the standard choice. It gives a clean, sharp edge against the horizon. The upper limb (top edge) is used when the lower limb is obscured by cloud or haze near the horizon — subtract the semidiameter instead of adding it.
Never sight the centre of the sun. It has no visible edge and cannot be aligned precisely.
Sun sights through cloud
Scattered cloud can still yield useful sights. Look for a clear patch moving toward the sun and prepare to take the sight the moment it clears. Pre-set the altitude, hold the instrument ready, and take the sight in the brief window available.
A sight taken through thin cirrus cloud is usable — the sun's limb remains sharp. Sight taken through a cloud edge or thick cumulus is not — the limb blurs and the alignment becomes unreliable. Discard it and wait.
New to this? Plain English explanation
Partly cloudy skies are the norm at sea, not the exception. You can often take a good sight through a thin gap even with substantial cloud cover. The key is preparation: have the sextant pre-set and be watching the gap coming, not scrambling to set up as the window appears and closes.
A clear horizon is more important than a clear sky above. If the horizon itself is sharp and defined, and the sun clears briefly, the sight can be excellent. If the horizon is hazy or indistinct — which often happens in the tropics — the sight will be poor regardless of how clear the sky is.
Why you swing the arc
The sextant measures altitude correctly only when it is held exactly vertical. Even a small tilt — a degree or two — causes the measured altitude to be too large, because you are measuring along a tilted plane rather than the vertical arc. The error grows with altitude: at 60° a 5° tilt introduces nearly 2' of error.
You cannot judge vertical by eye from a moving boat. Swinging the arc is how you find it without judgement.
The technique
With the sun in the field of view, rock the sextant from side to side — tilting left and right — while watching the sun's path. As you tilt, the sun traces an arc. At the lowest point of that arc, the sextant is exactly vertical.
The procedure: tilt left, watch the sun rise. Tilt right, watch the sun rise. Return to centre — the sun drops to its lowest. At that lowest point, tangent to the horizon, make your reading.
Done correctly this takes two to three seconds and becomes automatic with practice. Do it on every sight, every time. On a rolling boat it is not optional.
New to this? Plain English explanation
The swinging arc is the signature movement of the experienced celestial navigator and looks fluid and natural after practice. It takes most people a few sessions to feel natural — initially it is disorienting to deliberately tilt the instrument.
The key insight: you are using the arc motion to find the vertical, rather than trying to estimate it. The sun traces a curve in the eyepiece as you rock. The bottom of that curve is vertical. At that exact moment, bring the lower limb to kiss the horizon with the micrometer drum, and read.
On a flat, calm sea you can sometimes dispense with this and judge vertical by feel. On a seaway it is essential. Even a gentle 3° roll introduces enough error to matter.
Why take multiple sights
A single sight contains random errors — boat motion, imperfect horizon alignment, momentary distraction. Taking a series of sights (typically five to eight for the sun) and averaging reduces these random errors substantially. Systematic errors (index error, dip, poor horizon) are not reduced by averaging — they must be corrected properly.
New to this? Plain English explanation
Think of throwing darts at a board. Each throw has a small random error — your hand wobbles slightly each time. But if you throw ten darts and mark where they all land, the centre of that cluster is closer to the bullseye than any single dart was.
Celestial sights work the same way. Each individual sight has a small random error from boat motion, wobble of the instrument, or a momentary imperfection in your alignment. Take five sights, average them, and the random errors largely cancel out. What remains is much closer to the true altitude.
The averaging procedure
Take five to eight sights in sequence, each timed. Plot altitude against time. The points should fall on or near a smooth curve — for the sun they lie on a curve that follows the sun's rate of altitude change. Reject obvious outliers (more than 2' from the curve). Average the remaining sights.
A simpler method: take five sights, discard the highest and lowest, average the remaining three. This is less rigorous but fast and effective for practical navigation.
The averaging calculator
Enter up to six sights (degrees and decimal minutes). The calculator discards outliers beyond 2' of the mean and returns the averaged Ho.
What index error is
When the index arm is set to exactly 0°, the index mirror and horizon glass should be perfectly parallel — and a distant object should appear as a single unbroken image. If instead you see a step — two images slightly offset — the instrument has index error.
Index error is expressed in arc minutes, positive (on the arc) or negative (off the arc). It is applied to every sight: Hs corrected = Hs + IE (where IE is negative off the arc, positive on the arc).
New to this? Plain English explanation
Hold the sextant at 0° and look at the horizon. You should see one continuous, unbroken horizon line. If you see two slightly offset lines — a step up or down — that offset is the index error. The amount of offset, read off the micrometer drum, is the index error in arc minutes.
If you have to move the drum forward (into positive degrees) to make the lines meet, the IE is on the arc — subtract it from your sights. If you have to move the drum back (below zero) to make the lines meet, the IE is off the arc — add it to your sights. The mnemonic used by generations of navigators: if it's on, it's off; if it's off, it's on — meaning on the arc = subtract, off the arc = add.
Measuring with the horizon
Set the index arm to 0°. Look at the horizon. Adjust the micrometer drum until the two horizon images form a single unbroken line. Read the drum. If it reads 2.4' forward of zero, your IE is +2.4' (on arc, subtract). If it reads 1.8' behind zero, your IE is −1.8' (off arc, add).
Do this three times and average the results. A varying IE reading suggests the sextant has been strained — inspect the mirror mountings.
Measuring using the sun
More precise than the horizon method. Set the drum to 0°. Look at the sun (shades in). Two sun images will be visible. Bring them into coincidence — one method is direct (top of one touching bottom of other) and the other reversed (bottom of one above top of other). The IE is half the difference between the two drum readings.
This method eliminates any error from the horizon not being at infinity and gives a more reliable result in hazy conditions.
Index error calculator
The twilight window
Stars can only be sighted when both the stars and the horizon are simultaneously visible. This occurs during civil and nautical twilight — roughly 20 to 40 minutes after sunset, or the same period before sunrise. The window is short and the order of sighting matters.
Evening: take sights as soon as the first bright stars appear, while the horizon is still sharp. As darkness deepens, the horizon fades.
Morning: begin when the horizon first becomes visible. Stars fade as light grows, so work quickly.
New to this? Plain English explanation
The challenge with star sights is that you need two things simultaneously: a visible horizon (requires some daylight) and visible stars (requires some darkness). This overlap exists for only about 20 to 30 minutes at dawn and dusk. Miss the window and you either cannot see the horizon (too dark) or cannot see the stars (too light).
In practice: at evening twilight, the sky darkens first while the horizon remains visible. The first stars to appear are the brightest — Sirius, Vega, Arcturus, Jupiter. Take sights on these immediately. By the time the dimmer stars become visible, the horizon is often too dark to use. Plan for three to five sights in the window.
Star identification
You must know which star you are sighting before you can reduce the sight. The 57 navigational stars in the almanac cover most of what you will encounter. Identify them before going on deck using a star chart or the Module 02 almanac, which lists SHA and declination for the principal stars.
The brightest navigational stars — Sirius, Canopus, Arcturus, Vega, Capella, Rigel, Procyon, Betelgeuse — are hard to misidentify in a clear sky. Work from these when learning. Confirm identification by noting the star's approximate azimuth and altitude before sighting: if your calculation predicts the star at 42° altitude bearing 215°, the star you found at 42° bearing 215° is almost certainly the right one.
Technique differences from sun sights
Stars are points of light, not discs — so there is no semidiameter correction and no choice of limb. Centre the point of light on the horizon as precisely as you can. The micrometer drum adjustment is more critical because there is no broad limb to guide you.
Use the 4× telescope for star sights — the wider field makes finding the star and keeping it in the field of view much easier on a moving boat. The 7× gives a brighter image but a narrower field that a rolling vessel quickly moves the star out of.
New to this? Plain English explanation
Sighting a star at twilight on a moving boat is significantly harder than sighting the sun during the day. The sun is bright, large, easy to find, and gives you plenty of time. Stars are tiny, move quickly across the field of view as the boat moves, and the window is short.
The way to make it manageable: pre-set the sextant to the star's calculated altitude before going on deck. In the eyepiece, tilt the sextant slightly so the horizon is visible in the lower part. Move the instrument slowly toward the star's calculated azimuth until the star appears as a point of light above the horizon. Bring it down to the horizon with the micrometer drum. This sounds complicated but with practice takes about 10 seconds per star once you know where to look.
A good horizon
A good horizon is sharp, well-defined, and at a consistent level. In oceanic conditions with moderate sea state, the horizon is typically excellent. The best sights come from a clearly defined line between sea and sky with no haze band at the horizon.
Signs of a good horizon: the horizon appears as a sharp, clean line when looking through the telescope. The sea surface is visible. The sky above the horizon is distinctly lighter than the sea.
New to this? Plain English explanation
The quality of your sights depends almost as much on the horizon as on the body you are measuring. The horizon is half the alignment — if it is blurry or indistinct, the measurement cannot be precise regardless of how carefully you work the sextant.
The ideal horizon: look at it through the telescope before starting. It should appear as a sharp, clean edge — like a ruler line. You can see the sea surface on the near side and open sky on the far side. Under these conditions your sights can be accurate to 0.5 arc minutes. Under poor horizon conditions they may be accurate only to 3 or 4 arc minutes — which translates to 3 to 4 miles of position uncertainty.
Problem horizons
Haze band: a layer of atmospheric haze sits at the horizon, blurring the sea-sky boundary. Common in the tropics and in warm, humid air. The apparent horizon may be several miles closer than the true horizon — the dip correction will be incorrect. Sights taken through a haze band should be treated with caution.
Swell: a large ocean swell raises and lowers the horizon as each crest or trough passes. In heavy swell, the visible horizon from the crest of a wave is higher than the true horizon. Take sights from the trough of the swell if possible, or average a large number of sights taken over multiple wave periods.
Mirage: in strong temperature inversions (warm air over cold sea, or cold air over warm sea), the horizon can be displaced upward or downward by several miles. Impossible to correct for without knowing the thermal structure. If the horizon looks unusually sharp or elevated, be suspicious.
Overcast: a uniform cloud layer at the horizon makes the boundary between sea and sky invisible. No sight is possible without a defined horizon. Rain squalls at the horizon have the same effect.
New to this? Plain English explanation
Learning to assess horizon quality is part of developing a navigator's eye. Before each sight session, spend a few seconds looking at the horizon through the telescope with no body in view. Ask: can I see a clean line? Are there any haze layers? Is the swell obscuring the horizon periodically?
If the horizon is poor, you have two options: wait for better conditions, or take a larger number of sights and average them. Six sights over three minutes in moderate swell conditions will average out much of the variability and give a usable result. In genuinely bad conditions — rain, heavy haze, thick cloud at the horizon — no number of sights will give a reliable fix. Wait.
Night and artificial horizons
Without a visible horizon (overcast night, fog), a sea horizon cannot be used. An artificial horizon — a flat mirror or tray of mercury reflecting the sky — allows sights to be taken on land or when the natural horizon is unavailable. The body is sighted directly and in its reflection; the angle between them is twice the altitude. Divide by two.
This technique is mostly useful for practice ashore before a passage, or for calibration. At sea, if there is no horizon there is usually no solution until conditions improve.
Star
Finder
Enter your position, date and time. The finder plots every principal navigational star above your horizon — altitude, azimuth, magnitude. This is the tool you use in the last light before evening twilight.
Your position & time
How to use this before a sight session
Enter your approximate position and the time you plan to take evening star sights — typically 30–40 minutes after local sunset, or 30–40 minutes before local sunrise. The finder shows which stars are well placed: above 15° (to avoid refraction problems) and below 75° (easier to sight). Aim for three to five stars with azimuths spread across the compass — no two within 30° of each other.
Note the altitude and azimuth of your chosen stars before going on deck. Pre-set the sextant to the expected altitude and face the expected azimuth — the star should appear in the field of view within seconds.
Reading the plot
The plot is a polar view of the sky — your zenith at the centre, the horizon at the edge. Each circle represents 30° of altitude: the innermost ring is 60°, the middle is 30°, the outer edge is 0° (horizon). North is at the top, East to the right.
Star size indicates magnitude — larger dots are brighter. The amber zone between the two inner rings (15°–75° altitude) is the optimal sighting band. Stars in that zone make the best sights. Click or tap any star to see its identification notes and almanac data.
New to this? Plain English explanation
Think of the plot as a photograph of the sky above you, flattened out. The very centre is directly overhead. The outer edge is the horizon all around you. The rings at 30° and 60° altitude help you judge how high a star is.
Stars near the centre of the plot are high in the sky — nearly overhead. Stars near the edge are close to the horizon. For sights, you want stars somewhere in between: high enough that refraction near the horizon does not cause problems (above 15°), but not so high that they are hard to bring down to the horizon in the sextant (below about 75°).
The compass direction of a star on the plot tells you which way to face when looking for it. A star plotted toward the top-right is northeast of you, roughly 45° above the horizon.
Planetarium
Sky View
A live horizon-to-horizon sky view with constellation lines. Enter your position and time, choose a star, and see exactly where to look — bearing, altitude, and the surrounding constellations that will guide you to it.
Position & time
How to use this for sextant sights
Enter your position and the time you plan to take sights — typically 30 minutes after local sunset. Press Show sky. The sky renders with all stars at their correct positions. Select a target star to highlight it with an amber glow and light its constellation.
The readout shows bearing and altitude. Write these down or pre-set the sextant before going on deck — the star should appear in the telescope field of view within a few seconds of facing the right direction.
Reading the view
The view is a horizon panorama — as if you were standing on deck looking at the sky from horizon to zenith. The horizon runs across the bottom. The amber dashed line marks your zenith bearing (directly overhead). The altitude grid shows 15°, 30°, 45°, 60° above the horizon.
The amber band between 15° and 75° altitude is the optimal sighting zone. Stars in that band make the best sights — high enough that refraction is well-behaved, low enough that you can swing the arc comfortably.
New to this? Plain English explanation
Think of the view as standing on deck and looking straight ahead at the sky. The horizon is at the bottom. Stars near the top of the view are nearly overhead. The compass points along the bottom — North in the centre when no star is selected, or centred on your chosen star's bearing when one is selected.
The amber highlighted star is the one you are trying to find. The lines around it are its constellation — the pattern of nearby stars that help you identify it. Knowing the constellation means you can find the target star even if you cannot immediately recognise it: find the constellation shape first, then identify the star within it.
Full
Walkthrough
A complete sun sight, from the moment you pick up the sextant to a plotted line of position. Every step shown with the reasoning behind it. Then a home drill to test what you can do with a real instrument.
This is a complete worked example. The boat is at DR position 38°N 009°W, heading southwest in the North Atlantic. The date is 15 June. The time is 10:14:32 UT. The body is the sun. Work through each step in order.
Prepare the sextant
Before going on deck: measure index error. Set shade glasses for the sun. Calculate approximate altitude and azimuth from Module 02 and pre-set the sextant arc to that altitude.
New to this? Why pre-set the altitude?
If you go on deck with the sextant at zero degrees and try to find the sun, you will spend precious time sweeping the arc while the boat moves beneath you. If you pre-set the sextant to 62° and face ESE, the sun will appear in the telescope field of view almost immediately and you can begin refining the sight at once. This is standard practice.
Take the sight
Go to windward side of the deck. Brace against the shrouds. Hold the sextant loosely in the right hand. Find the sun in the telescope — pre-set altitude means it should appear near the horizon in the field of view. Swing the arc to find vertical. Bring the lower limb tangent to the horizon. Call mark.
Apply altitude corrections → Ho
Convert Hs to Ho by applying index error, dip, refraction, and semidiameter in sequence.
New to this? Why these corrections in this order?
Index error first because it is a property of the instrument — it affects every reading before anything else. Then dip, because the height of your eye defines which horizon you are using. Then refraction, because the atmosphere has bent the light before it reached your eye. Then semidiameter, because you sighted the edge of the disc rather than the centre. Each correction adjusts for a different physical reality, in the order those realities were encountered by the light on its way to you.
Get almanac data → GHA and Dec
From Module 02, compute sun GHA and declination for 15 June at 10:14:32 UT.
New to this? What are these numbers?
GHA tells you where the sun is in the sky right now relative to the Greenwich meridian — specifically, how far west of Greenwich the sun's geographical position has moved. At 10:14 UT the sun has been rising for about ten hours since midnight Greenwich time, moving at 15° per hour, so GHA is around 330° (nearly one full lap).
Declination N23°17.8' means the sun is 23.3° north of the celestial equator — this is close to the June solstice, when the sun reaches its maximum northern declination of N23°26'. This is why June days are long in the northern hemisphere.
Calculate LHA
Your assumed longitude is W 9°. LHA = GHA − West longitude.
Compute Hc and Zn
Apply the two equations with L = 38°N, d = N23.3°, LHA = 321.4°.
sin Hc = 0.6157×0.3955 + 0.7880×0.9184×0.7771
sin Hc = 0.2435 + 0.5628 = 0.8063
Hc = 53° 45.2'
cos A = (sin d − sin L · sin Hc) / (cos L · cos Hc)
cos A = (0.3955 − 0.6157×0.8063) / (0.7880×0.5916)
cos A = (0.3955 − 0.4966) / 0.4661 = −0.2170
A = 102.5°
LHA > 180° → Zn = A = 102.5°
Find the intercept
Compare Ho to Hc. The difference in minutes of arc is the intercept in nautical miles.
= +494.4' = 494 nm TOWARD
Wait — 494 nautical miles? That means the DR position was nearly 500 miles from the actual LOP. This is an intentionally large intercept to illustrate the point: the method works regardless of how wrong your starting position is. A real navigator with a reasonable DR would expect an intercept of less than 30 nm. Let's correct the example — use a DR position of 38°N 009°W and a more realistic Ho close to Hc.
New to this? What does TOWARD mean?
The intercept tells you which direction to move from your assumed position to reach the line of position. TOWARD means the sun was higher than expected — so you are closer to the sun's geographical position than you thought. Move 12.2 nautical miles toward the sun (bearing 102.5°) from your assumed position. AWAY would mean the sun was lower than expected — move away from it.
The nautical miles come directly from the minutes of arc difference. One minute of arc on the Earth's surface equals one nautical mile. This is the very definition of the nautical mile — which is why the system works so elegantly.
Plot the LOP
On a plotting sheet or chart: mark the assumed position. From it, draw a line 12.2nm along bearing 102.5°. Through that point, draw a line perpendicular to the azimuth (i.e., bearing 012.5° / 192.5°). That perpendicular line is your Line of Position. You are somewhere on it.
A second sight from a different body at the same time (or corrected for the time difference) gives a second LOP. Where the two lines cross is your position — a fix accurate to within 2–3 nautical miles in competent hands.
This drill is designed for use with a real sextant, on land or water. You will measure the sun's altitude, apply all corrections, and compute an intercept against your known position. The drill checks your arithmetic at every stage.
Step 1 — Your known position
Enter your actual known position (from a map, chart, or known landmark). This is what we will compare your celestial result against at the end.
Error
Analysis
Every sight contains errors. The skill is not in eliminating them — it is in recognising which are systematic and which are random, knowing their magnitude, and understanding what they do to your fix.
Systematic vs random
A systematic error shifts every sight in the same direction by the same amount. Index error is systematic — it adds or subtracts the same value from every reading. Uncorrected index error moves your entire LOP, not your cocked hat.
A random error varies from sight to sight with no consistent direction — boat motion, momentary loss of the horizon, distraction at the moment of mark. Random errors are reduced by averaging multiple sights. Systematic errors are not.
New to this? Plain English explanation
Imagine throwing ten darts at a board. If all ten land slightly to the left of where you aimed, that is a systematic error — your aim is consistently off in one direction. If they scatter in all directions around the bullseye, that is random error.
Averaging ten darts fixes the random scatter (the centre of the cluster is close to the bullseye) but does nothing about the systematic left bias — the centre of the cluster is still to the left. The same logic applies to sights: averaging removes random errors from boat motion, but a wrongly measured index error or an incorrect dip will shift every averaged result by the same wrong amount.
Error sources ranked by impact
| Source | Typical error | Type |
|---|---|---|
| Time error (4 sec) | 1.0 nm | Systematic |
| Index error (uncorrected 2') | 2.0 nm | Systematic |
| Dip error (wave obscures horizon) | 1–3 nm | Random |
| Refraction (below 10°) | 1–10 nm | Systematic |
| Abnormal refraction (mirage) | 5–30 nm | Systematic |
| Sextant arc error | 0.5–1 nm | Systematic |
| Observer wobble (single sight) | 0.5–2 nm | Random |
| Hazy horizon | 1–5 nm | Systematic |
How time error propagates
GHA increases at exactly 15 arc minutes per minute of time (0.25 arc minute per second). A time error shifts the computed GHA, which shifts the computed LHA, which shifts both Hc and Zn — moving the entire LOP.
The direction of movement depends on azimuth. A time error shifts the LOP along its own length when the body is north or south of you (Zn near 0° or 180°), and perpendicular to its length when the body is east or west (Zn near 90° or 270°). The worst case for a longitude error is an east or west body.
New to this? Plain English explanation
Think about what time tells you in celestial navigation. The almanac gives GHA — where the sun is relative to Greenwich — as a function of time. If your time is wrong by 10 seconds, you are using the wrong GHA. The sun has moved 2.5' of arc in those 10 seconds. Your calculation therefore assumes the sun is 2.5' away from where it actually was — and your LOP is displaced accordingly.
For a body bearing east or west of you, this 2.5' error translates almost directly into a position error of 2.5 nautical miles — parallel to the LOP you are trying to draw, meaning the LOP itself is displaced sideways. For a body bearing north or south, the same time error mostly slides the LOP along its own length, which matters less for your fix.
Time error calculator
What a bad horizon does
The horizon is half your measurement. Any error in where you see the horizon is directly transferred to your altitude reading — and unlike most errors, horizon problems are hard to detect and hard to quantify.
Haze band: a layer of haze sits between sea and sky, making the true horizon invisible. The navigator sights the top of the haze band as if it were the horizon. This is typically closer than the true horizon — the apparent dip is larger than the real dip, and the altitude reads too high.
Swell: from the crest of a large wave, the horizon is higher than normal — it appears to be the horizon, but it is actually a wave crest some distance away. The altitude reads too high. From a trough, the opposite. In a regular swell, alternating high and low readings average out correctly — but in a confused sea they may not.
New to this? Plain English explanation
When you align the sun with the horizon in the sextant, you are placing the sun's lower limb on a specific line. If that line is not the true horizon — because haze has obscured the actual sea-sky boundary, or because a wave crest is acting as the horizon — your measurement is referenced to the wrong datum. Every correction you apply afterward is correct, but they are all applied to a measurement that was fundamentally compromised at the moment of sighting.
The practical lesson: assess the horizon before every sight session. If you cannot see a clean, defined sea-sky boundary through the telescope, your sights will be unreliable regardless of technique. In those conditions, take more sights over a longer period to average out the variability, treat the resulting LOP with less confidence, and note the horizon quality in your sight log.
Dip error sensitivity
Standard refraction and its limits
The refraction formula used in the Corrections module assumes a standard atmosphere: 10°C, 1010mb pressure, normal humidity. Real atmospheres deviate — particularly near the horizon where the light path is longest and most atmosphere-dependent.
Below 10° altitude, refraction is both large (up to 5°+ at the horizon) and highly variable. At 5° altitude, a 10mb pressure change alters refraction by about 0.3'. A 10°C temperature change alters it by about 0.4'. In tropical or Arctic conditions these errors can reach 1–2', moving your LOP by 1–2 nautical miles without any way to correct for it.
New to this? Plain English explanation
Refraction — the bending of light by the atmosphere — is largest near the horizon. At 0° altitude (a body sitting on the horizon) refraction is nearly 34 arc minutes — more than half a degree. The correction tables assume average atmospheric conditions, but if the air is unusually cold, warm, dense, or humid, the actual bending differs from the table values.
The practical rule is simple: avoid sights below 10° altitude whenever possible. Above 10°, refraction is small enough and stable enough that standard corrections work well. Below 10°, you are in uncertain territory, and the lower you go the worse it gets. A sight at 3° altitude could have a refraction error of several miles that you have no way to calculate.
Abnormal refraction — the mirage effect
When a strong temperature inversion exists — warm air sitting over cold sea, or cold air over warm sea — the atmosphere acts as a lens. The horizon can appear to be elevated above its true position, or depressed below it, by an amount that swamps all other corrections.
Signs of abnormal refraction: the horizon appears unusually sharp and seems too high; distant ships or land masses appear to float above the sea surface; the sun appears distorted at the horizon (flattened or stretched). In these conditions, celestial sights should be treated with extreme caution or not taken at all.
Refraction sensitivity by altitude
| Altitude | Refraction | 1°C change | 10mb change | Reliability |
|---|---|---|---|---|
| 90° | 0.0' | 0.00' | 0.00' | Perfect |
| 45° | 1.0' | 0.00' | 0.01' | Excellent |
| 20° | 2.6' | 0.01' | 0.03' | Good |
| 10° | 5.2' | 0.02' | 0.05' | Acceptable |
| 5° | 9.9' | 0.04' | 0.10' | Caution |
| 2° | 18.4' | 0.08' | 0.18' | Avoid |
| 0° | 33.8' | variable | variable | Discard |
Azimuth spread
The geometry of a fix depends critically on the angle between your LOPs. Two LOPs crossing at 90° give a fix whose uncertainty circle is equal in all directions. Two LOPs crossing at 10° give a fix whose uncertainty is multiplied by 1/sin(10°) ≈ 5.8 — nearly six times larger along the perpendicular to both lines.
Rule of thumb: for a two-body fix, aim for azimuths at least 60° apart. For a three-body fix, aim for azimuths approximately 120° apart. The closer to evenly spaced around the compass, the better.
New to this? Plain English explanation
Imagine two lines drawn on paper. If they cross at 90°, a small error in either line produces only a small shift in the crossing point. If they cross at 10°, almost parallel, a tiny movement of one line shifts the crossing point enormously along the other line.
This is why choosing your sights strategically matters. Two stars both bearing roughly east give two nearly parallel LOPs — their crossing is poorly defined. One star bearing north and one bearing east give perpendicular LOPs — their crossing is well defined and your fix is reliable. On a star finder, look for bodies spread widely around the compass, not clustered in one direction.
Systematic error and the cocked hat
If all sights contain the same systematic error — an uncorrected index error, a consistently wrong dip — the cocked hat may be small and tidy, but it will be displaced from the true position. A small cocked hat does not mean a correct position. It means consistent technique.
A cocked hat whose azimuths span more than 180° of compass arc has a useful property: systematic altitude errors tend to move LOPs in different relative directions, so the true position tends to fall near the centre of the hat. When azimuths span less than 180°, systematic errors can push all LOPs the same way, placing the true position outside the hat entirely.
Fix uncertainty visualiser
Enter two azimuths and an assumed 1nm error in each LOP. The calculator shows the resulting position error ellipse.
Total sight error budget
Enter the estimated error in each component. The calculator propagates them to total position error.
Knowledge
Drill
Ten questions across all modules. Work through them in order or return here after completing a module. Every answer carries an explanation worth reading even when you get it right.